> ## Documentation Index
> Fetch the complete documentation index at: https://docs.onefirewall.com/llms.txt
> Use this file to discover all available pages before exploring further.
# FortiCloud WCF Integration
> Step-by-step guide to set up the FortiCloud Web Content Filtering integration with OneFirewall.
## Prerequisites
Before starting, make sure you have the following installed on the machine where the agent will run:
* [Docker](https://docs.docker.com/get-docker/)
* [Docker Compose](https://docs.docker.com/compose/install/)
Need help installing Docker and Docker Compose? Follow the [WCF Installation Guide](https://docs.onefirewall.com/essentials/wcf-installation) for a step-by-step walkthrough.
***
## Step 1 — Open the WCF Installation Page
Navigate to the WCF installation page in the OneFirewall portal (please, refer to your on premises installation):
[https://app.onefirewall.com/install-wcf.html](https://app.onefirewall.com/install-wcf.html)
***
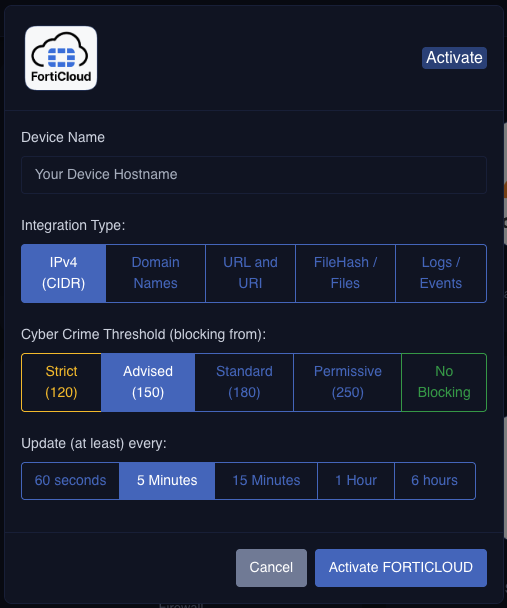
## Step 2 — Select FortiCloud
On the integration page, select **FortiCloud** from the list of available connectors.
 ***
## Step 3 — Configure the Integration
Fill in the required fields:
| Field | Description |
| --------------- | ------------------------------------------------------------------- |
| **Device Name** | A unique name to identify this device within OneFirewall |
| **Type** | Select **IPv4** |
| **Score** | Set the threat score threshold to use for filtering |
| **Update Time** | How often the agent fetches updated data (e.g. every **5 minutes**) |
Setting the update time to **5 minutes** is recommended for near-real-time threat intelligence updates.
***
## Step 4 — Activate FortiCloud
Once all fields are filled in, click the **Activate FORTICLOUD** button.
After activation, OneFirewall will generate a ready-to-use `docker-compose.yml` file with all the required environment variables pre-populated for your account.
***
## Step 5 — Deploy with Docker Compose
### The generated `docker-compose.yml`
Your configuration file will look like the following:
```yaml docker-compose.yml theme={null}
services:
fortiappsec-updater:
image: registry.onefirewall.com/onefirewall-wcf-agent-fortiappsec:v1
platform: linux/amd64
container_name: fortiappsec-updater
environment:
- FORTINET_API_KEY=${FORTINET_API_KEY}
- EP_ID=${EP_ID}
- OFA_API_URL=${OFA_API_URL}
- OFA_JWT_TOKEN=${OFA_JWT_TOKEN}
- OFA_SCORE=${OFA_SCORE}
- AGID=${AGID}
- KEEP_DAYS=${KEEP_DAYS:-30}
- SCRIPT_DIR=/app/backups
- DEMO_MODE=${DEMO_MODE:-false}
- IP_LIMIT=${IP_LIMIT:-9999}
volumes:
- ./backup:/app/backups
restart: "always"
```
The environment variables (e.g. `OFA_JWT_TOKEN`, `AGID`) are automatically filled in by OneFirewall after you click **Activate FORTICLOUD**.
The environment variables `FORTINET_API_KEY`, `EP_ID` are instead the parameters of your API\_KEY on FortiAppSec application, and the EP\_ID is the application ID and should be configured from your organization values.
### Start the agent
Save the generated `docker-compose.yml` to a directory on your machine, then run:
```bash theme={null}
docker-compose up -d
```
The agent will start in the background and begin syncing threat intelligence data with your FortiGate device at the configured update interval.
***
## Verify the Agent is Running
To check that the container started correctly, run:
```bash theme={null}
docker ps
```
You should see `fortiappsec-updater` listed with a status of `Up`.
To view live logs:
```bash theme={null}
docker logs -f fortiappsec-updater
```
***
## Troubleshooting
Check the logs with `docker logs fortiappsec-updater`. A missing or invalid environment variable is the most common cause — make sure you copied the exact `docker-compose.yml` generated after activation.
Make sure Docker is authenticated with the OneFirewall registry. Contact support if you receive a `403 Forbidden` or `unauthorized` error when pulling the image.
Verify the container is running and check that the `OFA_JWT_TOKEN` is still valid. Tokens may expire — re-activating the integration on the portal will issue a new token.
***
## Step 3 — Configure the Integration
Fill in the required fields:
| Field | Description |
| --------------- | ------------------------------------------------------------------- |
| **Device Name** | A unique name to identify this device within OneFirewall |
| **Type** | Select **IPv4** |
| **Score** | Set the threat score threshold to use for filtering |
| **Update Time** | How often the agent fetches updated data (e.g. every **5 minutes**) |
Setting the update time to **5 minutes** is recommended for near-real-time threat intelligence updates.
***
## Step 4 — Activate FortiCloud
Once all fields are filled in, click the **Activate FORTICLOUD** button.
After activation, OneFirewall will generate a ready-to-use `docker-compose.yml` file with all the required environment variables pre-populated for your account.
***
## Step 5 — Deploy with Docker Compose
### The generated `docker-compose.yml`
Your configuration file will look like the following:
```yaml docker-compose.yml theme={null}
services:
fortiappsec-updater:
image: registry.onefirewall.com/onefirewall-wcf-agent-fortiappsec:v1
platform: linux/amd64
container_name: fortiappsec-updater
environment:
- FORTINET_API_KEY=${FORTINET_API_KEY}
- EP_ID=${EP_ID}
- OFA_API_URL=${OFA_API_URL}
- OFA_JWT_TOKEN=${OFA_JWT_TOKEN}
- OFA_SCORE=${OFA_SCORE}
- AGID=${AGID}
- KEEP_DAYS=${KEEP_DAYS:-30}
- SCRIPT_DIR=/app/backups
- DEMO_MODE=${DEMO_MODE:-false}
- IP_LIMIT=${IP_LIMIT:-9999}
volumes:
- ./backup:/app/backups
restart: "always"
```
The environment variables (e.g. `OFA_JWT_TOKEN`, `AGID`) are automatically filled in by OneFirewall after you click **Activate FORTICLOUD**.
The environment variables `FORTINET_API_KEY`, `EP_ID` are instead the parameters of your API\_KEY on FortiAppSec application, and the EP\_ID is the application ID and should be configured from your organization values.
### Start the agent
Save the generated `docker-compose.yml` to a directory on your machine, then run:
```bash theme={null}
docker-compose up -d
```
The agent will start in the background and begin syncing threat intelligence data with your FortiGate device at the configured update interval.
***
## Verify the Agent is Running
To check that the container started correctly, run:
```bash theme={null}
docker ps
```
You should see `fortiappsec-updater` listed with a status of `Up`.
To view live logs:
```bash theme={null}
docker logs -f fortiappsec-updater
```
***
## Troubleshooting
Check the logs with `docker logs fortiappsec-updater`. A missing or invalid environment variable is the most common cause — make sure you copied the exact `docker-compose.yml` generated after activation.
Make sure Docker is authenticated with the OneFirewall registry. Contact support if you receive a `403 Forbidden` or `unauthorized` error when pulling the image.
Verify the container is running and check that the `OFA_JWT_TOKEN` is still valid. Tokens may expire — re-activating the integration on the portal will issue a new token.