> ## Documentation Index
> Fetch the complete documentation index at: https://docs.onefirewall.com/llms.txt
> Use this file to discover all available pages before exploring further.
# ForcePoint NGFW Integration
## Overview
This guide explains how to integrate **OneFirewall Alliance (OFA) Threat Feeds** with **ForcePoint NGFW** using **Security Management Center (SMC)** and \*\*External Dynamic Feeds \*\*.
You can enforce threat intelligence feeds for the following categories:
* ✅ Malicious IPs
* ✅ Malicious URLs
This integration enables real-time enforcement of security policies based on live threat data provided by OneFirewall Alliance.
***
## Supported ForcePoint Versions
OneFirewall threat feeds are compatible with Forcepoint NGFW Software. 7.0; 6.11; 6.10; 6.9; 6.8; 6.7; 6.5. Security Management Center (SMC).
***
## Prerequisites
* ✅ A valid **OneFirewall Alliance** account.
* ✅ Forcepoint running **6.5 or later** (7.0 recommended).
* ✅ Ability to operate in the console.
* ✅ Internet access from the gateway to reach OneFirewall's feed URLs.
* ✅ HTTPS inspection must allow outbound connections to threat feed URLs (if required by policy).
***
## Step 1: Generate API Token
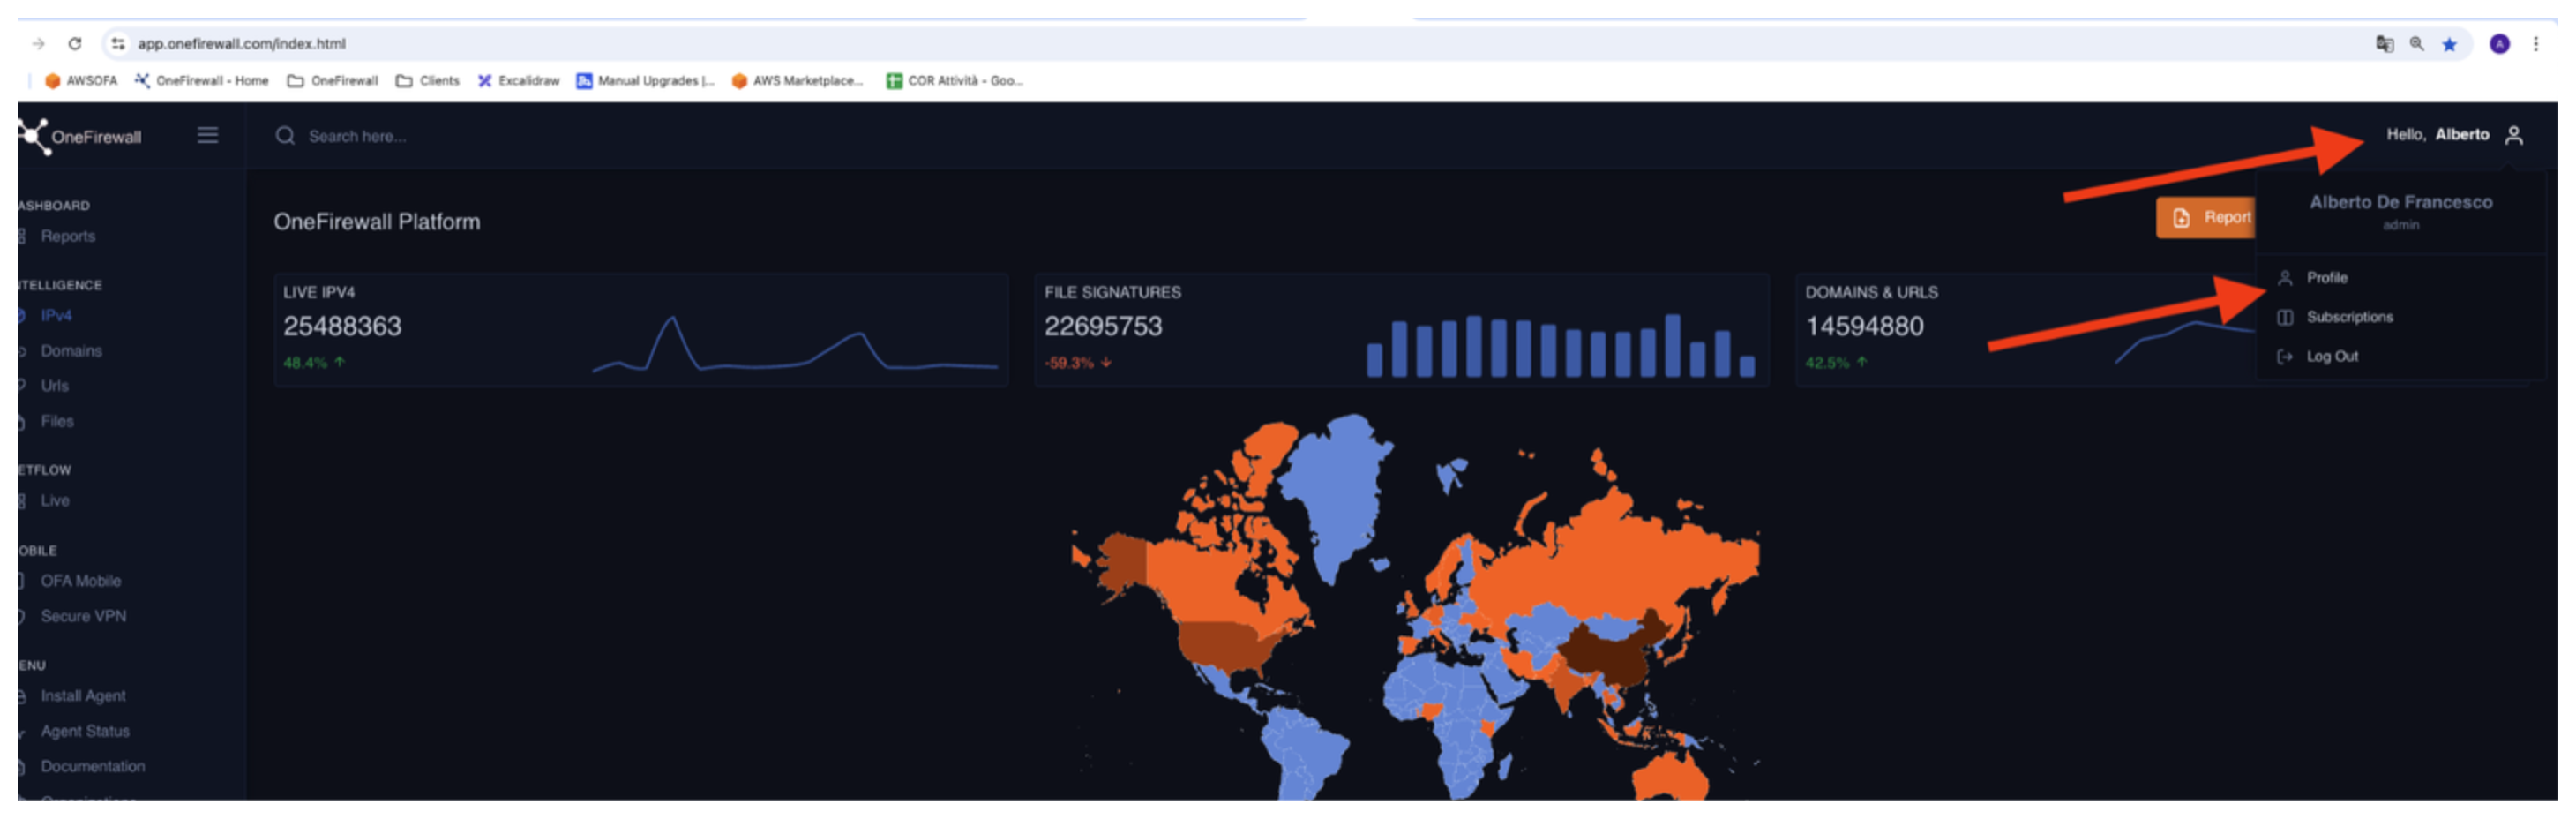
1. Log into your **OneFirewall Alliance** dashboard.
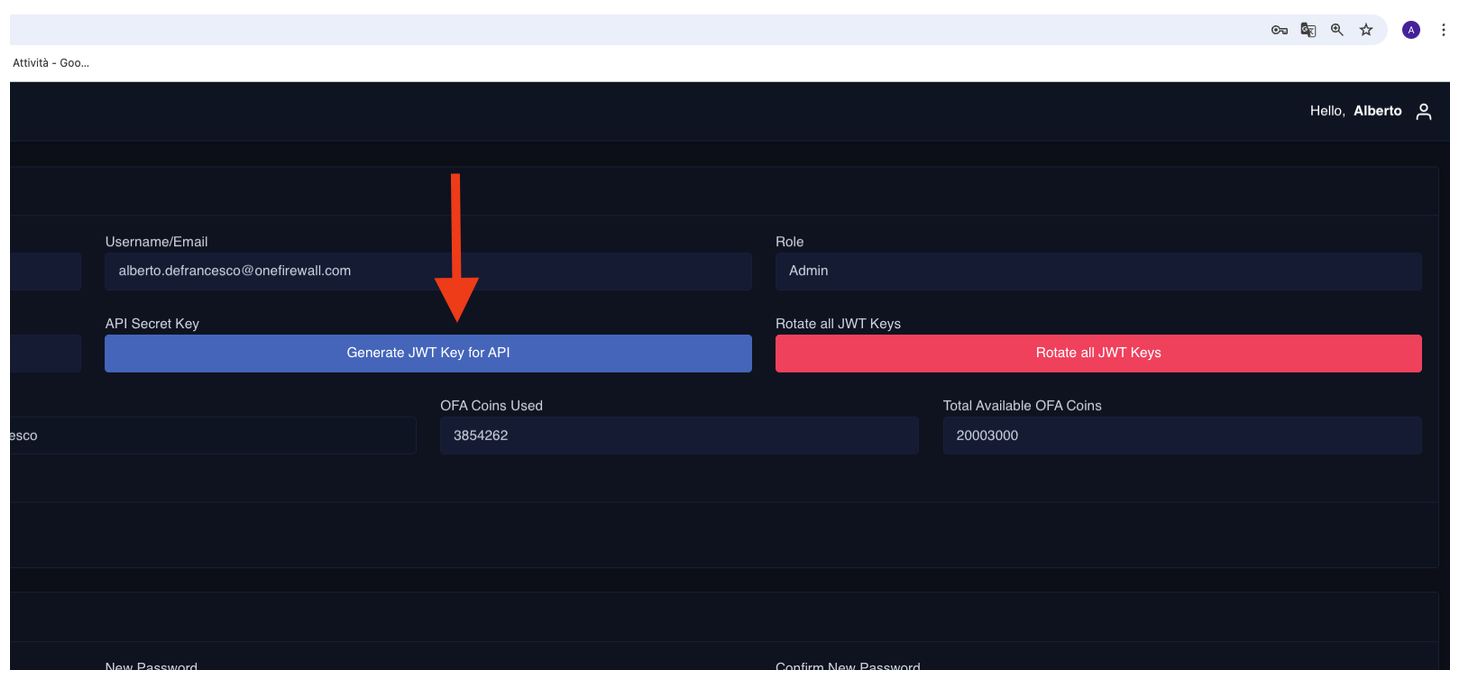
2. Go to the **API Access** section.
3. Click **Generate JWT Token**.
4. Save the token securely — this will be used to authenticate feed requests.
 ***
## Step 2: Configure IP Address List and URL List
For each threat type, follow these general steps:
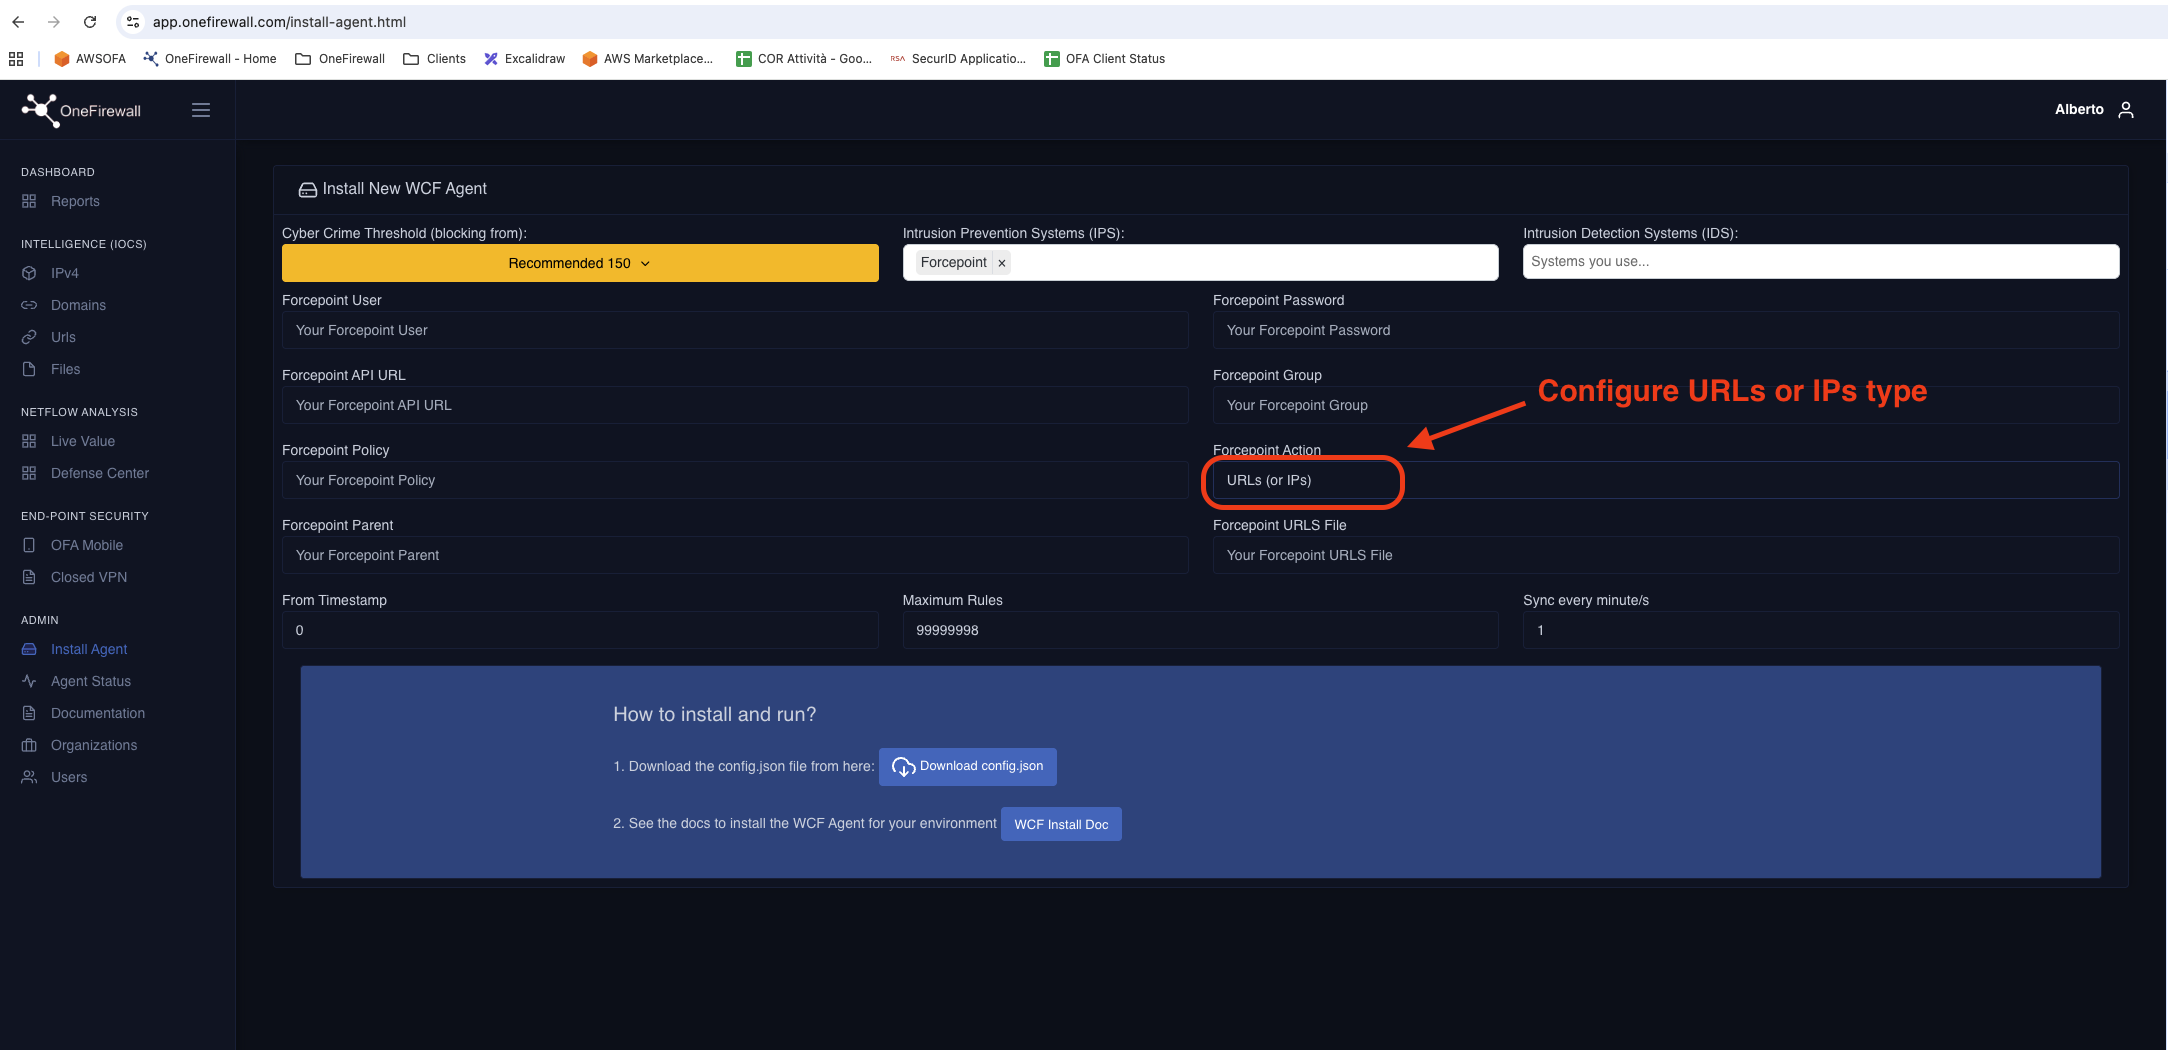
### Configure the External Feeds
***
## Step 2: Configure IP Address List and URL List
For each threat type, follow these general steps:
### Configure the External Feeds
 #### Install Docker & Docker Compose
```bash theme={null}
# On Debian/Ubuntu
sudo apt update
sudo apt install -y docker.io
sudo systemctl enable --now docker
# Install Docker Compose
sudo curl -L "https://github.com/docker/compose/releases/download/$(curl -s https://api.github.com/repos/docker/compose/releases/latest | jq -r '.tag_name')/docker-compose-$(uname -s)-$(uname -m)" \
-o /usr/local/bin/docker-compose
sudo chmod +x /usr/local/bin/docker-compose
```
#### Prepare Your Deployment Directory
```
mkdir -p ~/wcf-agent-forcepoint
cd ~/wcf-agent-forcepoint
```
1. Download the WCF Agent Docker image into this folder.
2. Obtain your config.json from OneFirewall’s Install Agent page.
3. Place config.json in \~/wcf-agent/onefirewall/config.
#### Create docker-compose.yml
```yaml theme={null}
version: '3'
services:
onefirewall-wcf-agent-forcepoint-ngfw:
image: registry.onefirewall.com/onefirewall-wcf-agent-forcepoint:v4
restart: always
environment:
- IS_TEST=False
volumes:
- ./storage/logs:/var/tmp/
- ./storage/data:/opt/onefirewall/data/
- ./onefirewall/config:/opt/onefirewall/config/:ro
```
Contact OneFirewall support team with access to download WCF Agent binary image
#### Launch the Agent
```
docker compose up -d
docker-compose logs -f onefirewall-wcf-agent-forcepoint-ngfw
```
***
## Notes
* OneFirewall uses **JWT-based Bearer Authentication**.
* Feeds are **auto-refreshable** and optimized for ForcePoint NGFW SMC 7.0 integration.
* All feed types can be used **simultaneously** in different rules or combined policies.
#### Install Docker & Docker Compose
```bash theme={null}
# On Debian/Ubuntu
sudo apt update
sudo apt install -y docker.io
sudo systemctl enable --now docker
# Install Docker Compose
sudo curl -L "https://github.com/docker/compose/releases/download/$(curl -s https://api.github.com/repos/docker/compose/releases/latest | jq -r '.tag_name')/docker-compose-$(uname -s)-$(uname -m)" \
-o /usr/local/bin/docker-compose
sudo chmod +x /usr/local/bin/docker-compose
```
#### Prepare Your Deployment Directory
```
mkdir -p ~/wcf-agent-forcepoint
cd ~/wcf-agent-forcepoint
```
1. Download the WCF Agent Docker image into this folder.
2. Obtain your config.json from OneFirewall’s Install Agent page.
3. Place config.json in \~/wcf-agent/onefirewall/config.
#### Create docker-compose.yml
```yaml theme={null}
version: '3'
services:
onefirewall-wcf-agent-forcepoint-ngfw:
image: registry.onefirewall.com/onefirewall-wcf-agent-forcepoint:v4
restart: always
environment:
- IS_TEST=False
volumes:
- ./storage/logs:/var/tmp/
- ./storage/data:/opt/onefirewall/data/
- ./onefirewall/config:/opt/onefirewall/config/:ro
```
Contact OneFirewall support team with access to download WCF Agent binary image
#### Launch the Agent
```
docker compose up -d
docker-compose logs -f onefirewall-wcf-agent-forcepoint-ngfw
```
***
## Notes
* OneFirewall uses **JWT-based Bearer Authentication**.
* Feeds are **auto-refreshable** and optimized for ForcePoint NGFW SMC 7.0 integration.
* All feed types can be used **simultaneously** in different rules or combined policies.