> ## Documentation Index
> Fetch the complete documentation index at: https://docs.onefirewall.com/llms.txt
> Use this file to discover all available pages before exploring further.
# OFA-DNS Servers
> Step-by-step guide to change DNS settings on the most common OS and Italian ISP routers.
# Configuring DNS
This guide explains how to change OneFirewall Alliance DNS settings on the most common **OS Windows, Linux, MAC iOS** and routers provided by **Fastweb**, **Vodafone**, **TIM**, and **WindTre**.\
Menu labels may vary slightly depending on your router model, but the workflow is similar across devices.
**If your router cannot handle two or more DNS servers, please use only one OFA-DNS server and the Alternative as in the 3th DNS Server section**
## OFA DNS Servers
| Provider | Primary DNS | Secondary DNS |
| -------- | ----------- | ------------- |
| OFA-DNS | `ofa-dns1` | `ofa-dns2` |
Please contact [support@onefirewall.com](mailto:support@onefirewall.com) for get configuration values and to enable your ISP Provider
## 3th DNS Server to add at the configuration
You can choose the one provided from you ISP Provider or one of the following existing DNS Providers
| Provider | Primary DNS | Secondary DNS |
| ---------- | ---------------- | ----------------- |
| Google | `8.8.8.8` | `8.8.4.4` |
| Cloudflare | `1.1.1.1` | `1.0.0.1` |
| OpenDNS | `208.67.222.222` | `208.67.220.220` |
| Quad9 | `9.9.9.9` | `149.112.112.112` |
***
## Windows (10 / 11)
### Using Settings
1. Open **Settings**.
2. Go to **Network & Internet**.
3. Select Wi-Fi or Ethernet.
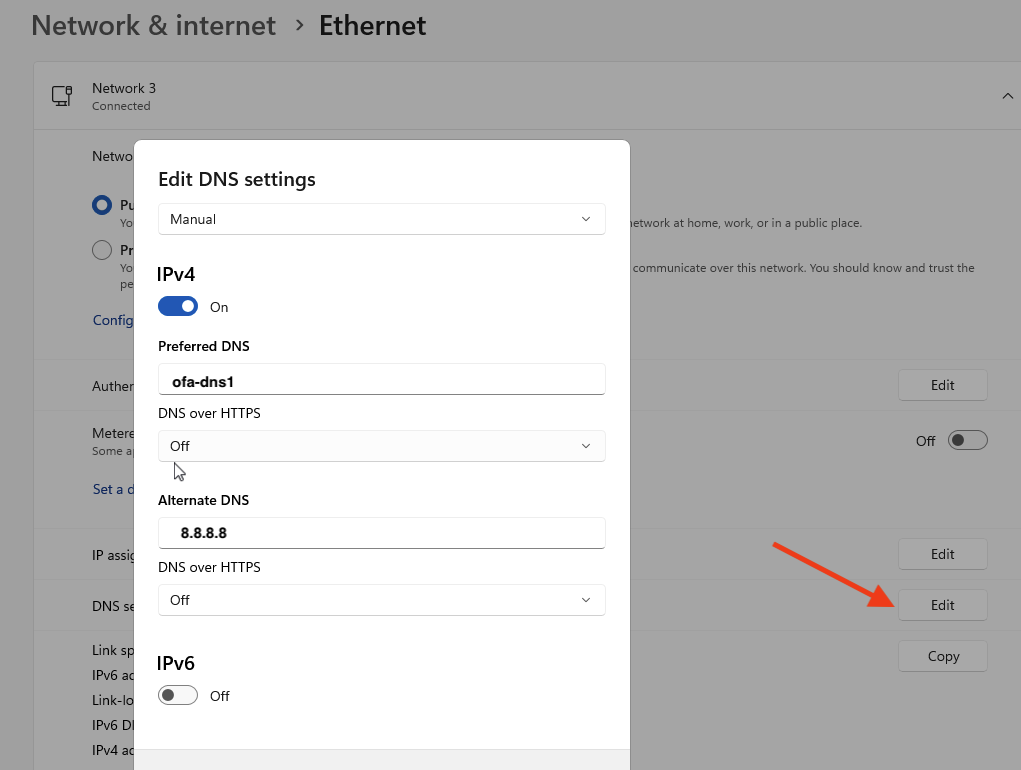
4. Find **DNS server assignment** and click **Edit**.
5. Choose **Manual** and enable **IPv4**.
6. Enter your DNS servers.
7. Save.
 ### Using Control Panel
1. Open Control Panel.
2. Network and Sharing Center → Change adapter settings.
3. Right‑click interface → Properties.
4. Select **Internet Protocol Version 4 (TCP/IPv4)** → Properties.
5. Choose **Use the following DNS server addresses**.
6. Enter DNS values.
7. OK.
## Linux (Ubuntu / Debian / Fedora / etc.)
### Method 1 — NetworkManager (GUI)
### Steps
1. Open **System Settings** (or **System Preferences** on older versions).
2. Select **Network**.
3. Choose your active connection:
* Wi-Fi
* Ethernet
4. Click **Details…** (or **Advanced…**).
5. Open the **DNS** tab.
6. Click the **+** button and add your DNS servers.
7. Example:
```
ofa-dns1, ofa-dns2, 8.8.8.8
```
### Using Control Panel
1. Open Control Panel.
2. Network and Sharing Center → Change adapter settings.
3. Right‑click interface → Properties.
4. Select **Internet Protocol Version 4 (TCP/IPv4)** → Properties.
5. Choose **Use the following DNS server addresses**.
6. Enter DNS values.
7. OK.
## Linux (Ubuntu / Debian / Fedora / etc.)
### Method 1 — NetworkManager (GUI)
### Steps
1. Open **System Settings** (or **System Preferences** on older versions).
2. Select **Network**.
3. Choose your active connection:
* Wi-Fi
* Ethernet
4. Click **Details…** (or **Advanced…**).
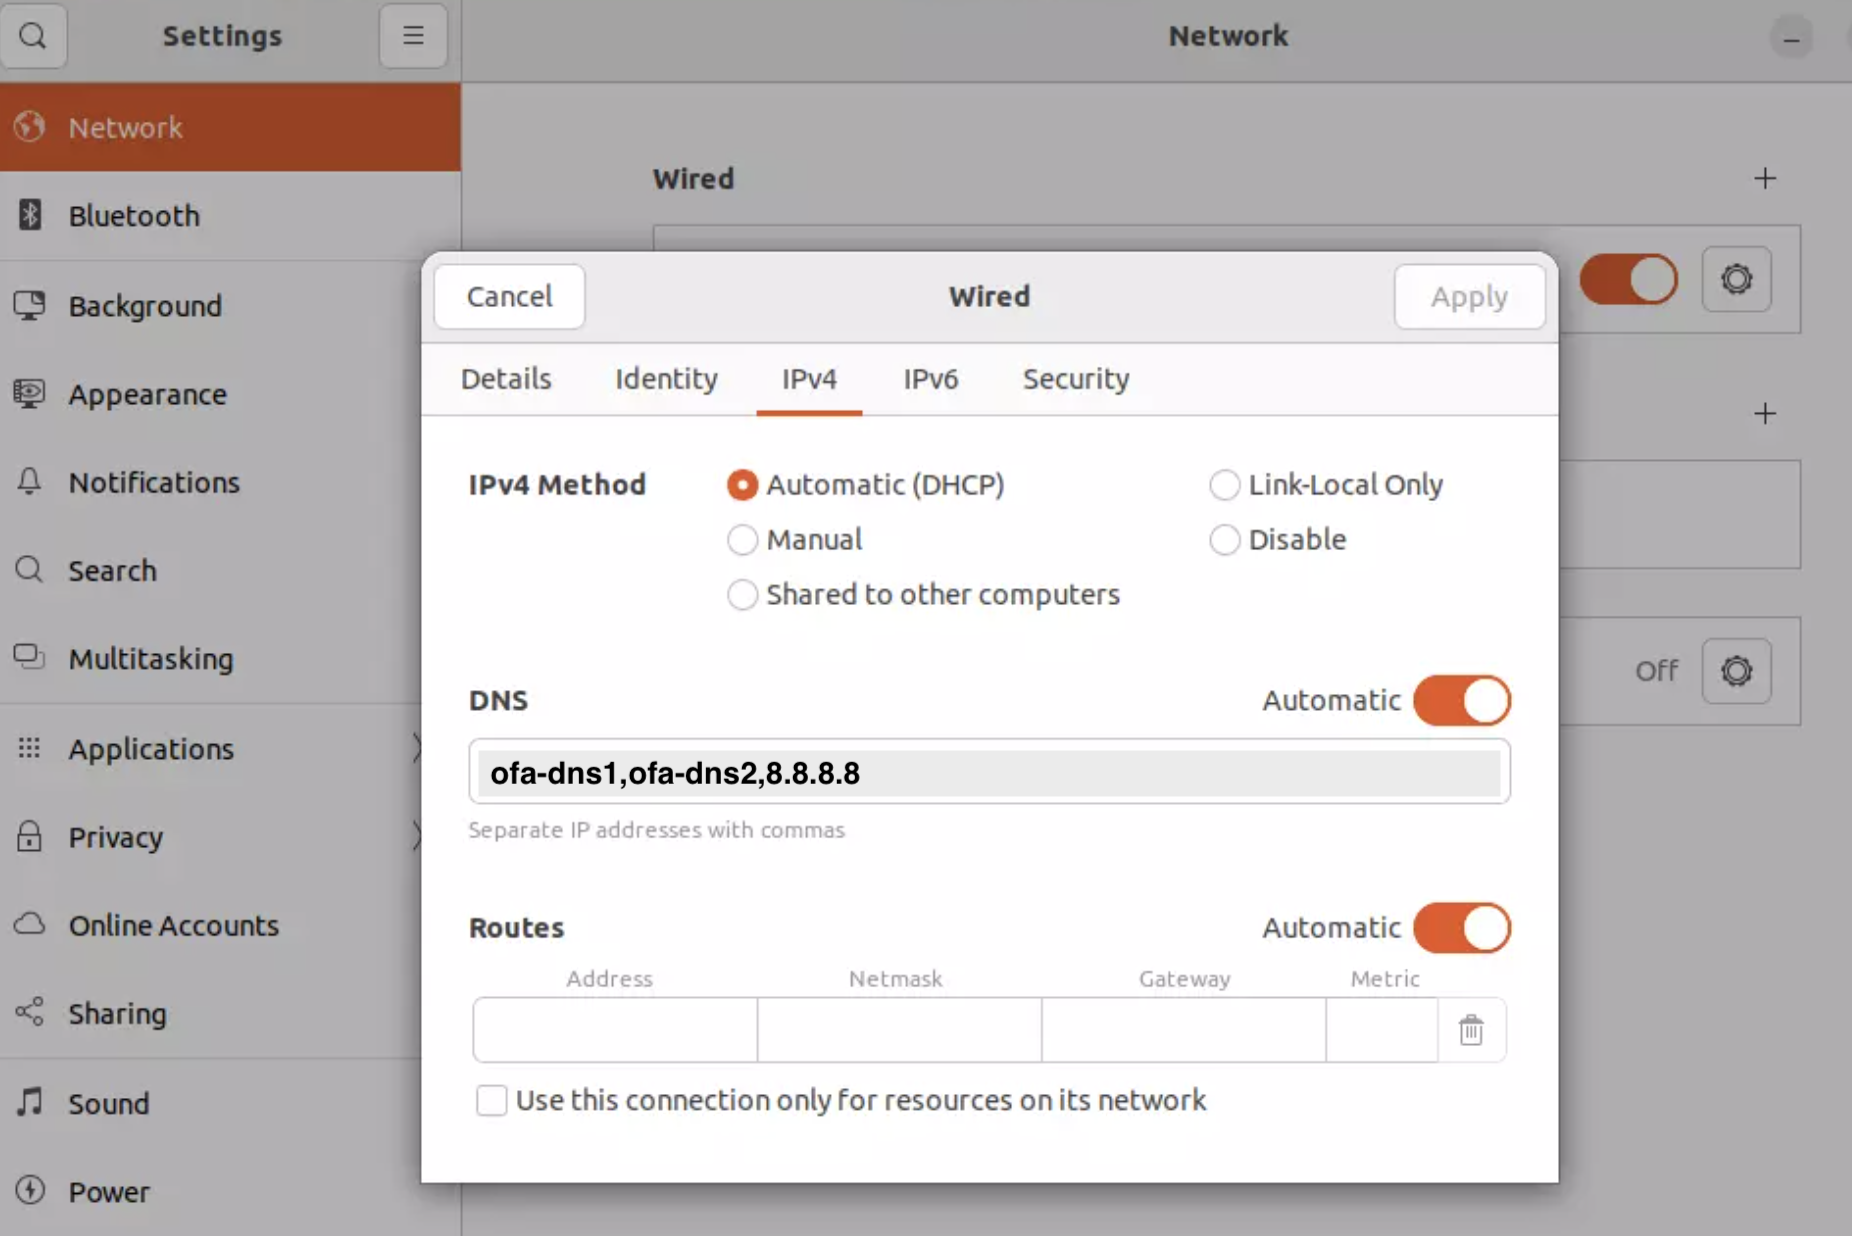
5. Open the **DNS** tab.
6. Click the **+** button and add your DNS servers.
7. Example:
```
ofa-dns1, ofa-dns2, 8.8.8.8
```
 ### Method 2 — Netplan (Ubuntu Server)
Edit the file:
```bash theme={null}
sudo nano /etc/netplan/*.yaml
```
Add:
```yaml theme={null}
nameservers:
addresses: [ofa-dns1, ofa-dns2, 8.8.8.8]
```
Apply:
```bash theme={null}
sudo netplan apply
```
### Method 3 — resolv.conf (manual)
```bash theme={null}
sudo nano /etc/resolv.conf
```
Add:
```bash theme={null}
nameserver ofa-dns1
nameserver ofa-dns2
nameserver 8.8.8.8
```
## macOS (Tahoe / Ventura / Monterey / Big Sur)
### Steps
1. Open **System Settings** (or **System Preferences** on older versions).
2. Select **Network**.
3. Choose your active connection:
* Wi-Fi
* Ethernet
4. Click **Details…** (or **Advanced…**).
5. Open the **DNS** tab.
6. Click the **+** button and add your DNS servers.
7. Example:
```
ofa-dns1
ofa-dns2
8.8.8.8
```
### Method 2 — Netplan (Ubuntu Server)
Edit the file:
```bash theme={null}
sudo nano /etc/netplan/*.yaml
```
Add:
```yaml theme={null}
nameservers:
addresses: [ofa-dns1, ofa-dns2, 8.8.8.8]
```
Apply:
```bash theme={null}
sudo netplan apply
```
### Method 3 — resolv.conf (manual)
```bash theme={null}
sudo nano /etc/resolv.conf
```
Add:
```bash theme={null}
nameserver ofa-dns1
nameserver ofa-dns2
nameserver 8.8.8.8
```
## macOS (Tahoe / Ventura / Monterey / Big Sur)
### Steps
1. Open **System Settings** (or **System Preferences** on older versions).
2. Select **Network**.
3. Choose your active connection:
* Wi-Fi
* Ethernet
4. Click **Details…** (or **Advanced…**).
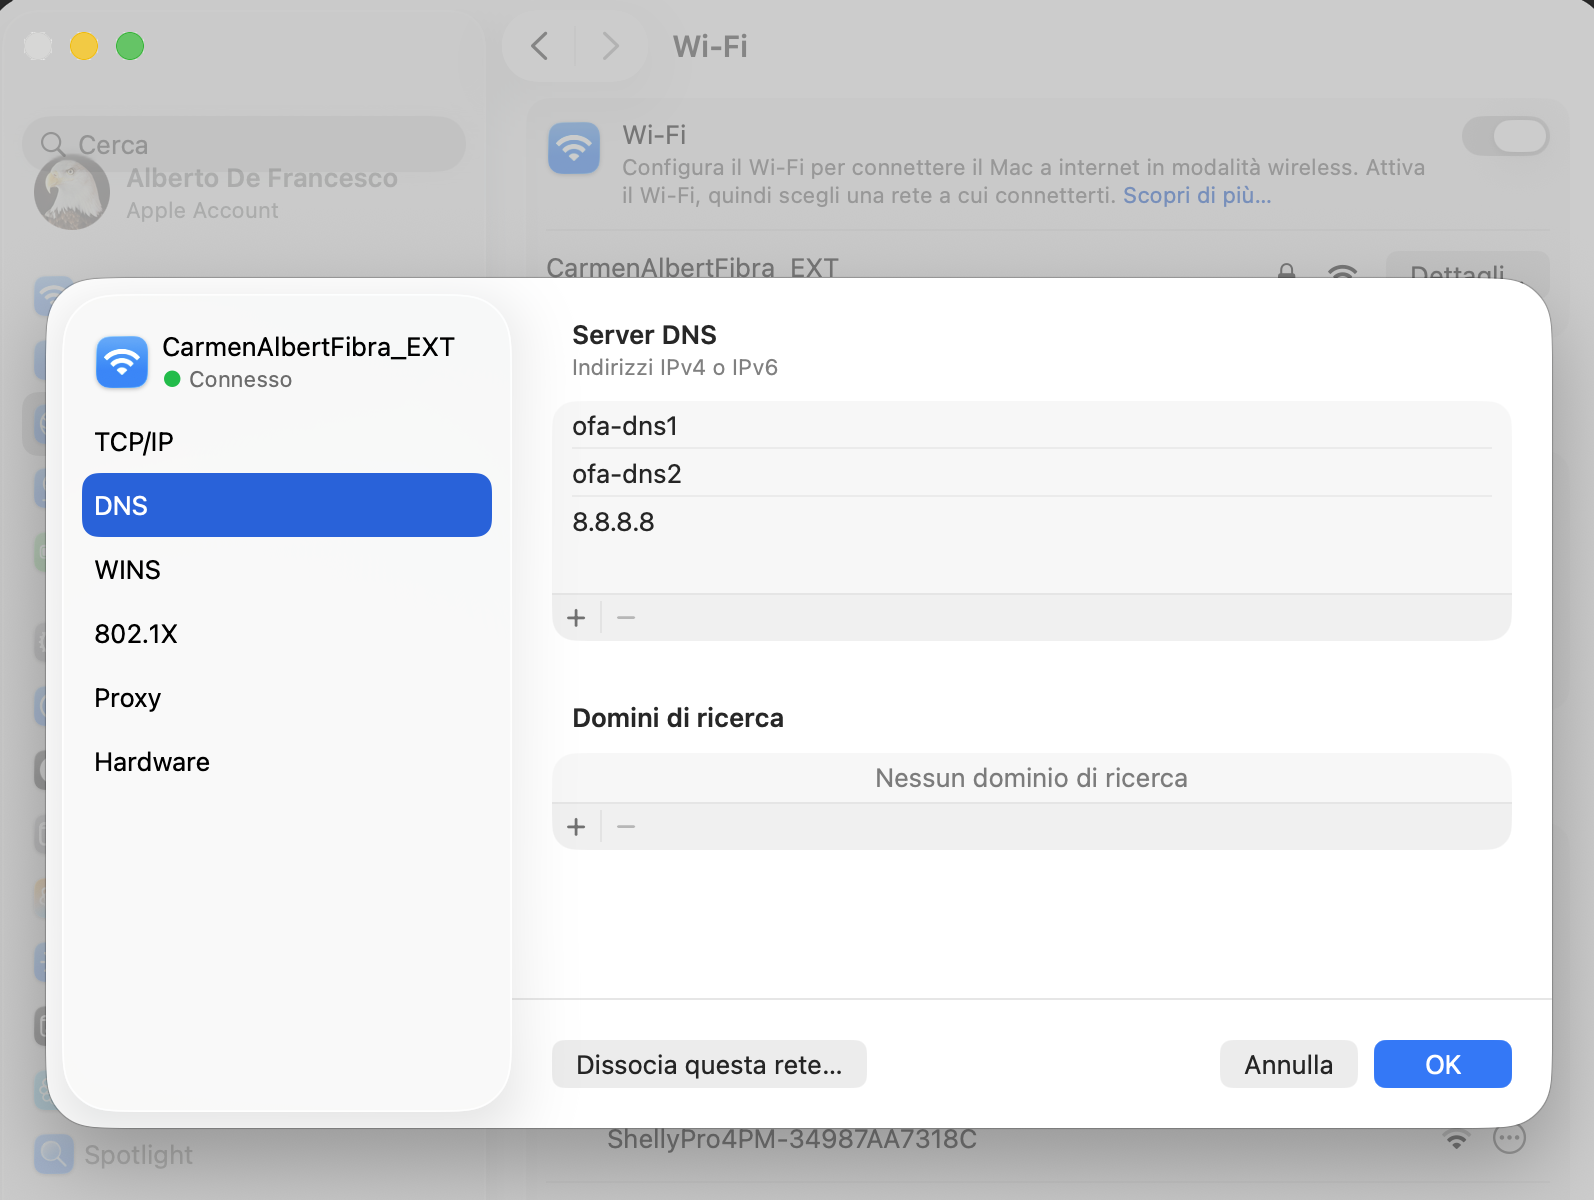
5. Open the **DNS** tab.
6. Click the **+** button and add your DNS servers.
7. Example:
```
ofa-dns1
ofa-dns2
8.8.8.8
```
 ***
## Fastweb Routers
:::warning
Some Fastweb routers **do not allow DNS changes** on the WAN connection.\
If the DNS section is missing, configure DNS directly on your device or use your own router in cascade.
:::
### Steps
1. Open your browser and navigate to:
* `http://192.168.1.254`
* `http://192.168.1.1`
2. Log in using the credentials on the router label.
3. Go to **Advanced Settings → Internet → DNS**.
4. Disable **Automatic DNS**.
5. Enter your preferred DNS servers.
```
ofa-dns1
ofa-dns2
8.8.8.8
```
6. Save and restart the router.
***
## Vodafone Routers (Vodafone Station / Power Station)
:::warning
Many Vodafone Station models **lock DNS settings** on the primary connection.\
If DNS options do not appear, use device-level DNS or a third-party router.
:::
### Steps
1. Access the router via:
* `http://192.168.1.1`
* `http://vodafone.station`
2. Log in with the password printed on the router.
3. Navigate to **Settings → Internet → Advanced Settings → DNS**.
4. Disable **Automatic DNS**.
5. Add your custom DNS servers.
```
ofa-dns1
ofa-dns2
8.8.8.8
```
6. Save and reboot.
***
## TIM Routers (Smart Modem, TIM HUB, TIM HUB+)
Most TIM routers allow DNS modification without restrictions.
### Steps
1. Go to: `http://192.168.1.1`
2. Log in using the admin password from the router label.
3. Open **Advanced → WAN / Internet Settings → DNS**.
4. Turn off **Automatic DNS**.
5. Input the DNS servers you prefer.
```
ofa-dns1
ofa-dns2
8.8.8.8
```
6. Save and restart the router.
***
## WindTre Routers (Home\&Life, Zyxel, D-Link)
WindTre routers generally allow DNS configuration.
### Steps
1. Open your browser and go to `http://192.168.1.1`.
2. Log in using the credentials printed on the device.
3. Navigate to **Advanced Settings → Internet → IPv4 → DNS**.
4. Disable **Automatic DNS Assignment**.
5. Enter custom DNS values.
```
ofa-dns1
ofa-dns2
8.8.8.8
```
6. Save and run a reboot.
***
## Need a model-specific guide?
Please contact [support@onefirewall.com](mailto:support@onefirewall.com) with the router specific version, and we support you through the configuration
***
## Fastweb Routers
:::warning
Some Fastweb routers **do not allow DNS changes** on the WAN connection.\
If the DNS section is missing, configure DNS directly on your device or use your own router in cascade.
:::
### Steps
1. Open your browser and navigate to:
* `http://192.168.1.254`
* `http://192.168.1.1`
2. Log in using the credentials on the router label.
3. Go to **Advanced Settings → Internet → DNS**.
4. Disable **Automatic DNS**.
5. Enter your preferred DNS servers.
```
ofa-dns1
ofa-dns2
8.8.8.8
```
6. Save and restart the router.
***
## Vodafone Routers (Vodafone Station / Power Station)
:::warning
Many Vodafone Station models **lock DNS settings** on the primary connection.\
If DNS options do not appear, use device-level DNS or a third-party router.
:::
### Steps
1. Access the router via:
* `http://192.168.1.1`
* `http://vodafone.station`
2. Log in with the password printed on the router.
3. Navigate to **Settings → Internet → Advanced Settings → DNS**.
4. Disable **Automatic DNS**.
5. Add your custom DNS servers.
```
ofa-dns1
ofa-dns2
8.8.8.8
```
6. Save and reboot.
***
## TIM Routers (Smart Modem, TIM HUB, TIM HUB+)
Most TIM routers allow DNS modification without restrictions.
### Steps
1. Go to: `http://192.168.1.1`
2. Log in using the admin password from the router label.
3. Open **Advanced → WAN / Internet Settings → DNS**.
4. Turn off **Automatic DNS**.
5. Input the DNS servers you prefer.
```
ofa-dns1
ofa-dns2
8.8.8.8
```
6. Save and restart the router.
***
## WindTre Routers (Home\&Life, Zyxel, D-Link)
WindTre routers generally allow DNS configuration.
### Steps
1. Open your browser and go to `http://192.168.1.1`.
2. Log in using the credentials printed on the device.
3. Navigate to **Advanced Settings → Internet → IPv4 → DNS**.
4. Disable **Automatic DNS Assignment**.
5. Enter custom DNS values.
```
ofa-dns1
ofa-dns2
8.8.8.8
```
6. Save and run a reboot.
***
## Need a model-specific guide?
Please contact [support@onefirewall.com](mailto:support@onefirewall.com) with the router specific version, and we support you through the configuration